
Published: May 2026 | Last updated: May 2026 Reading time: 14 minutes
A wig can have perfect HD lace, beautifully bleached knots, and the softest human hair money can buy — and still look obviously fake if the hairline is too dense. The reason is simple: real hair doesn’t grow in a solid, uniform wall at the front. It thins out gradually, scatters unevenly, and fades into your forehead. Factory wigs almost never come that way.
Plucking is how you fix that. By removing individual hairs from the lace, you thin the hairline to mimic how hair actually grows — and it’s one of the highest-impact things you can do to make a wig look real.
To pluck a lace wig: place it on a mannequin head, use precision tweezers, and remove individual hairs from the front 1-2 inches of the hairline. Pluck more densely at the very edge and less as you move back, working in an uneven, scattered pattern (never straight lines). Pluck 10-15 hairs at a time, then step back and check from arm’s length. Stop while it still looks slightly too dense — plucking is permanent and beginners almost always overdo it.
Why You Need to Pluck (and Why Factories Don’t Do It Perfectly)
When a wig is made, hair is ventilated into the lace at a consistent density across the whole hairline. That uniformity is efficient to produce, but it’s the opposite of how a natural hairline looks.
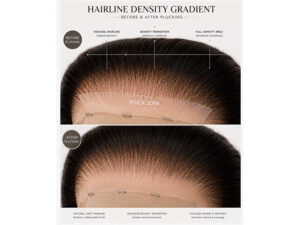
Look at your own hairline in the mirror. The hairs at the very front edge are sparse and fine. They get gradually denser as you move back toward the crown. There’s no hard line where “no hair” suddenly becomes “full hair.” Plucking recreates that gradient.
Pre-Plucked vs. Plucking It Yourself
| Pre-Plucked (Factory) | Plucking Yourself | |
|---|---|---|
| Effort | None — ready to wear | 30-60 min of careful work |
| Customization | Generic pattern | Matched to your face |
| Risk | Sometimes over-plucked at factory | You control it (for better or worse) |
| Natural result | Bien | Best, if done carefully |
| Best for | Beginners, quick installs | Anyone wanting the most natural look |
Recommendation: even if your wig comes pre-plucked, you’ll usually want to do a light final pluck to customize it. But if you’re a total beginner, start with a pre-plucked unit and pluck only a little — you’ll build confidence without risking too much.
What You’ll Need
- Precision tweezers (pointed-tip, not flat-tip — pointed grabs single hairs)
- A mannequin head (canvas or foam)
- T-pins to secure the wig
- A rat-tail comb for sectioning
- Good lighting — natural daylight is best
- A handheld mirror to check from different angles
- Patience — genuinely the most important tool
The Step-by-Step Plucking Process
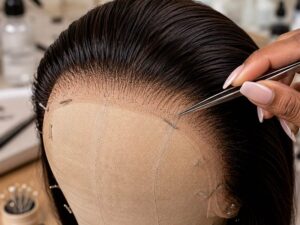
STEP 1 Secure the Wig on a Mannequin Head
- Place the wig on a mannequin head sized close to your own head
- Pin it down firmly with T-pins so it won’t shift
- Plucking on your own head is much harder and riskier — always use a stand
- Position the head at eye level in good lighting
STEP 2 Identify Your Plucking Zone
- The zone to pluck is the front 1-2 inches of the hairline
- Beyond 2 inches back, leave the density alone — that area should stay full
- Use a comb to lightly separate the front section you’ll be working on
- Mentally divide the hairline into thirds: center, and two sides toward the temples
STEP 3 Start at the Very Front Edge
- Begin plucking at the very front edge of the hairline, where hair should be sparsest
- Grab one hair at a time with the pointed tweezers, close to the knot
- Pull in the direction the hair grows (don’t yank against it — that can tear the lace)
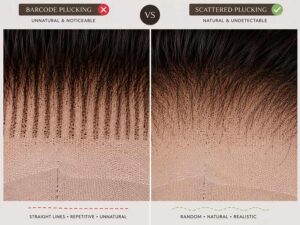
- Remove single hairs, scattered randomly, not in rows
STEP 4 Build the Gradient Backward
- As you move back from the front edge toward the crown, pluck fewer and fewer hairs
- The front edge: most sparse
- Half an inch back: moderately thinned
- One inch back: lightly thinned
- Two inches back: barely touched / full
- This creates the natural gradient from sparse to full
STEP 5 Check Constantly From Arm’s Length
- After every 10-15 hairs, stop
- Step back and look at the hairline from arm’s length — the distance people actually see you from
- Up close everything looks dense; the real test is from a few feet away
- Use a handheld mirror to view it from the front, as you’d be seen
- If it still looks too dense, pluck a few more. If it looks right, STOP.
STEP 6 Refine the Temples and Baby Hairs
- The temple areas (sides of the hairline) should be slightly more sparse than the center
- Leave a few longer fine hairs at the very front to become your baby hairs
- Don’t pluck baby hairs away — you’ll style these later during install
- Aim for a soft, irregular temple edge, not a sharp corner
STEP 7 Final Inspection
- View the hairline in different lighting — daylight, indoor, and with phone flash
- The flash test is important: it reveals density that looks fine in normal light
- Check symmetry — both temples should look balanced, but not identical (real hairlines aren’t perfectly symmetric)
- If satisfied, you’re done. If a spot looks too dense, do a final light pass.
-
How Much Should You Pluck?
This is the question that trips up everyone. The honest answer: less than you think.
Our stylist team’s rule of thumb is to pluck in three short sessions rather than one long one, especially when you’re learning:
- Session 1: Pluck the very front edge lightly. Stop. Look at it the next day.
- Session 2: If still too dense, thin the front 1 inch a bit more. Stop. Look again.
- Session 3: Final refinements only.
Spacing it out forces the restraint that prevents over-plucking. Once you’ve done a few wigs, you’ll develop an eye for it and can do it in one sitting.
Different face shapes and ages call for different hairline densities. Younger looks tend to have fuller hairlines; mature, natural looks have a softer, sparser front. A baby-hair-heavy look popular in some styles needs a different pluck than a sleek pulled-back look. There’s no single “correct” density — pluck to match the look you’re going for and your own natural hairline, which you can study in the mirror.
Plucking for Different Skin Tones and Hairlines
For Black women specifically, a few considerations:
- Match your natural hairline shape. If your natural edges have a widow’s peak, a curved hairline, or specific baby hair patterns, mimic that in your pluck so the wig looks like your own hair.
- Don’t over-thin if you wear deep skin + light lace. Over-plucked sparse hairlines can expose more lace, which then needs more tinting to avoid looking gray. Balance plucking with your lace tinting plan.
- Coordinate with bleached knots. Plucking and knot bleaching work together — a plucked hairline with bleached knots is the gold standard for a melted, natural look. (See our knot-bleaching guide.)
How to Fix an Over-Plucked Wig
If you’ve already plucked too much, don’t panic. There are ways to recover, though none fully restore the lost hair:
- Reposition the hairline. If you over-plucked the very front, you can cut the lace slightly further back during install, effectively moving the “start” of the hairline to a denser area.
- Use a hair fiber or concealer. Tinted hairline powders and fiber sprays can fill sparse spots temporarily for a single wear.
- Add baby hairs strategically. Laying baby hairs over sparse zones can disguise mild over-plucking.
- Wear it pulled back. Styles that don’t expose the very front hairline hide over-plucking.
- For severe cases: a professional can sometimes re-ventilate hairs into the lace, but it’s costly and not always worth it on a mid-range unit.
Common Plucking Mistakes
Mistake 1: Over-plucking
What happens: Permanent bald spots, sparse hairline that exposes lace. Fix: Pluck in sessions, stop while slightly too dense.
Mistake 2: Plucking in straight lines
What happens: Barcode-looking, obviously fake hairline. Fix: Scatter your pulls randomly.
Mistake 3: Plucking too far back
What happens: Thin overall hairline, loss of fullness. Fix: Stay within the front 1-2 inches.
Mistake 4: Yanking against the grain
What happens: Torn lace, multiple hairs pulled at once. Fix: Pull gently in the growth direction, one hair at a time.
Mistake 5: Using flat-tip tweezers
What happens: Grabs multiple hairs, hard to control. Fix: Use pointed-tip precision tweezers.
Mistake 6: Plucking on your own head
What happens: Can’t see clearly, uneven results, risk of plucking your real edges. Fix: Always use a mannequin head.
Mistake 7: Not checking from a distance
What happens: Hairline that looks fine up close but wrong from afar. Fix: Step back and check from arm’s length frequently.
Frequently Asked Questions
Do I need to pluck a pre-plucked wig?
Usually a little. Factory pre-plucking is a generic starting point. A light final pluck customized to your face and hairline gives the most natural result. But if you’re a beginner, you can wear a pre-plucked unit as-is and pluck more once you’re comfortable.
How long does it take to pluck a lace wig?
30-60 minutes for a careful first-time pluck. With experience, it drops to 15-20 minutes. Our team recommends spacing your first pluck over a couple of short sessions to avoid overdoing it.
What tweezers are best for plucking a wig?
Pointed-tip precision tweezers. Flat-tip tweezers grab multiple hairs at once and make it hard to control density. Pointed tips let you grab single hairs near the knot.
Can I pluck a synthetic lace wig?
Yes, plucking works on both synthetic and human hair wigs since you’re removing hairs from the lace, not chemically treating them. Be even more careful with synthetic, as the fibers can be more brittle.
How do I know if I’ve plucked enough?
Check from arm’s length in good lighting. The hairline should fade gradually from sparse at the front edge to full toward the crown, with no hard line. If it still reads as a solid wall of hair from a few feet away, pluck a little more. If it looks soft and graduated, stop.
Will plucking damage my wig?
Not if done gently. Pulling single hairs in the growth direction is safe. The risks come from yanking (which tears lace) and over-plucking (which permanently thins the hairline). Take your time.
Can I fix a wig I over-plucked?
Partially. You can reposition the hairline further back when cutting the lace, use hairline fiber/concealer to fill gaps, or style the wig pulled back to hide the front. Severe over-plucking sometimes requires professional re-ventilation, which is costly.
Should I pluck before or after bleaching the knots?
Most stylists bleach knots first, then pluck, since plucking after removes some of the knots you bleached. But the order isn’t critical — both should be done before your first install. See our knot-bleaching guide for the bleaching process.
Continue Learning
- [Internal link to Blog #1] La guía completa de pelucas de encaje
- [Internal link to Blog #10] How to Bleach Knots on a Lace Wig
- [Internal link to Blog #12] How to Lay Your Edges with a Lace Wig
- [Internal link to Blog #13] How to Make a Lace Wig Look Natural: 12 Pro Tips
- [Internal link to Blog #15] Why Does My Lace Wig Look Fake? 8 Common Mistakes