
Published: May 2026 | Last updated: May 2026 Reading time: 15 minutes
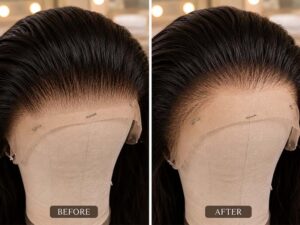
You’ve spent good money on a lace wig, installed it carefully, laid your edges — and yet up close, the hairline still gives it away. Tiny dark dots scattered across the lace, like a field of little freckles. Those are the knots, and they’re one of the biggest reasons a wig reads as “fake” in close-up photos and bright light.
Bleaching the knots lightens those dark dots so they blend into the lace and disappear against your scalp. Done right, it’s the difference between a wig that sits on your head and a wig that looks like it grew from it. Done wrong, it weakens the hair, causes shedding, or tears the lace entirely.
What Are Knots, and Why Do They Show?
When a lace wig is made, each strand of hair is tied to the lace by hand. The tiny knot that secures the hair to the lace sits right at the base of every strand. On most human hair, these knots are dark — because the hair itself is dark — so they appear as small dark dots across the lace.
From a distance, you don’t notice them. But up close — in selfies, under flash, in direct sunlight — those dark dots cluster together and create a faint shadow across your “scalp.” Your brain reads it as “wig,” even if it can’t say exactly why.
Bleaching the knots lightens these dots to a softer brown or blonde, so they blend with the lace and stop casting that giveaway shadow.
Should You Bleach Knots Yourself, or Buy Pre-Bleached?
Before we get into the how, our team wants to be honest about whether you should do this at all.
| Option | Pros | Cons |
|---|---|---|
| Bleach yourself | Cheaper, full control, can re-bleach as needed | Risk of damage, shedding, lace tears; takes practice |
| Buy pre-bleached | No risk, factory-controlled process, ready to install | Costs more, knots already weakened by bleach at factory |
What You’ll Need
- Bleach powder (blue or white lightening powder)
- 20-volume developer (do NOT use 30 or 40 volume — too strong for delicate knots)
- A small bowl and brush for mixing and applying (non-metal bowl)
- Foil or plastic wrap to cover during processing
- Gloves
- A mannequin head to hold the wig
- T-pins to secure the wig to the head
- Purple shampoo (to neutralize brassiness after bleaching)
- Deep conditioner (to restore moisture after the chemical process)
- A timer
- Old towel (bleach stains)
The Step-by-Step Bleaching Process
Read all the way through before you start. Once bleach is on the knots, the clock is running and you can’t pause to look something up.
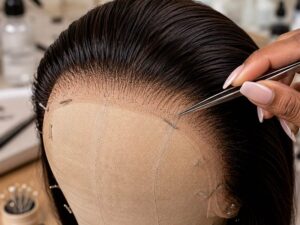
STEP 1 Secure the Wig Inside Out
- Turn the wig inside out so the underside of the lace (where the knots sit) faces up
- Place it on a mannequin head
- Pin it securely with T-pins so it doesn’t shift
- The knots you’re bleaching are on the inside of the cap — this is the side that touches your scalp
STEP 2 Protect the Hair Shaft
You only want to bleach the knots, not the actual hair. Bleach on the hair shaft will lighten your wig’s color in patches.
- Tuck the length of the hair away from the lace, down through the cap
- Some stylists place a strip of plastic wrap between the lace and the hair to act as a barrier
- The goal: when you apply bleach to the knots, it can’t seep onto the hair strands below
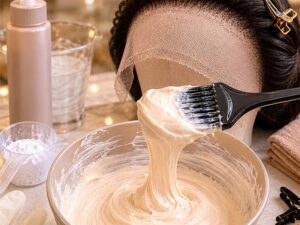
STEP 3 Mix the Bleach
- In a non-metal bowl, combine bleach powder and 20-volume developer
- Ratio: roughly 1 part powder to 2 parts developer
- Mix to a thick, creamy, yogurt-like consistency — not runny
- A thick mixture stays on the knots and doesn’t bleed onto the hair
- Mix only what you need; bleach starts losing potency once activated
STEP 4 Apply a Thin Layer to the Knots
- Using the brush, apply a thin, even layer of bleach over the knots
- Focus on the hairline/perimeter knots first — these are the most visible when worn
- Don’t glob it on. A thin layer lightens evenly; a thick layer over-processes the surface while leaving deeper knots dark
- Gently pat the bleach into the lace so it reaches the knots, but don’t scrub
- Avoid getting bleach on the hair shaft below the knots
Concentrate your effort on the front 2 inches of the hairline. Those are the knots people actually see when you wear the wig. The knots deeper in the part area matter far less. Many first-timers exhaust their bleach and their nerves trying to do the entire cap — but the perimeter is 90% of the visual payoff for a fraction of the risk.
STEP 5 Cover and Process
- Cover the bleached area with foil or plastic wrap
- This traps warmth and humidity, helping the bleach work evenly
- Set a timer and check every 5 minutes
- Processing time is usually 15-30 minutes, but it varies by hair color and thickness
- Darker, coarser hair takes longer; lighter hair lifts faster
STEP 6 Check the Color Frequently
- Wipe a small section clean with a damp cloth to check the knot color
- You want the knots to reach a light golden brown — not white-blonde
- Knots that match a medium-to-light brown blend best against most skin tones
- Over-bleaching to white makes the knots brittle and prone to shedding
- Once most knots reach golden brown, stop — don’t chase perfection on every single knot
STEP 7 Rinse Thoroughly
- Remove the foil/plastic
- Rinse the bleach out completely with cool-to-lukewarm water
- Rinse from the inside of the cap, letting water flow away from the hair
- Make sure every trace of bleach is gone — leftover bleach keeps processing and weakens the knots further
STEP 8 Neutralize and Tone
- Apply a small amount of purple shampoo to counteract any brassy/orange tones in the bleached knots
- Leave on for 2-3 minutes, then rinse
- This step keeps the knots looking like a natural light brown rather than orange
STEP 9 Deep Condition
Bleaching is chemically harsh. The hair and knots need moisture restored immediately.
- Apply a generous deep conditioner from mid-shaft to ends (and lightly on the knots)
- Leave on for 20-30 minutes
- Rinse with cool water
- This is not optional — skipping it leaves the hair dry, brittle, and prone to breakage
STEP 10 Air-Dry and Inspect
- Air-dry the wig on a stand (no heat)
- Once dry, turn it right-side out and inspect the knots in good light
- If some knots are still dark, you can spot-bleach them in a second light pass once the wig has fully recovered (wait at least 48 hours)
- For any remaining visible knots, a touch of skin-tone concealer or foundation on the lace during install will hide them
The “No-Bleach” Alternatives
If bleaching feels too risky — and for some wigs it genuinely is — there are gentler ways to reduce the appearance of knots:
Concealer or foundation method
Dab a skin-tone concealer or foundation onto the lace during install. This doesn’t lighten the knots, but it tints the surrounding lace to your skin tone, reducing the contrast that makes knots visible. Quick, reversible, zero risk.
Knot sealer + powder
Some wearers apply a knot sealer (from the inside) then dust a skin-tone setting powder over the lace from the top. This dulls the shine and softens the knot appearance without any chemicals.
Tinted lace from the factory
Buying a wig with pre-tinted lace in your skin tone reduces knot visibility significantly, because the lace and knots already sit closer to your complexion.
Just buy pre-bleached
The simplest option. Factory pre-bleached knots arrive ready to install, with the bleaching done under controlled conditions.For Black women with deep skin tones, here’s a nuance worth knowing: you often don’t want your knots bleached too light. Bright blonde knots can actually look more obvious against deep skin than medium-brown knots would. The goal isn’t the lightest possible knots — it’s knots that match the tone of your scalp. For deep complexions, a golden-brown knot blended with tinted lace usually looks more natural than fully bleached white knots.
How Bleaching Affects Wig Lifespan
Let’s be honest about the trade-off. Bleaching knots improves the look but costs you some durability:
- Bleached knots shed more over time. The chemical weakening means strands release from the lace more easily, especially at the hairline.
- The effect is gradual. A well-bleached wig won’t fall apart, but you may notice slightly more shedding at the front over months.
- Over-bleached knots shed fast. If you pushed the knots to white-blonde or processed too long, expect noticeable hairline thinning within weeks.
- Proper deep conditioning slows the damage. Keeping the hair moisturized after bleaching helps the knots hold longer.
This is the core reason our team suggests bleaching only the visible perimeter knots, using 20-volume developer, and stopping at golden brown. The gentler you are, the longer the wig lasts.
Common Bleaching Mistakes
Mistake 1: Using 30 or 40 volume developer
What happens: Bleach burns through the delicate knots and can dissolve the lace. Fix: Always 20 volume for knots.
Mistake 2: Over-processing to white-blonde
What happens: Knots become brittle, shedding accelerates, and on deep skin the white knots look more obvious. Fix: Stop at golden brown.
Mistake 3: Mixture too runny
What happens: Bleach bleeds onto the hair shaft, lightening the hair in patches. Fix: Mix to a thick, yogurt-like consistency.
Mistake 4: Skipping the deep conditioner
What happens: Hair becomes dry, brittle, and breaks. Fix: Deep condition every time, no exceptions.
Mistake 5: Bleaching a synthetic wig
What happens: Bleach destroys synthetic fiber entirely. Fix: Only bleach human hair wigs.
Mistake 6: Not checking frequently enough
What happens: Over-processing past the safe point. Fix: Check every 5 minutes without fail.
Mistake 7: Applying bleach too thick in one spot
What happens: Uneven lift — surface knots lighten while deeper ones stay dark. Fix: Thin, even layers.
Frequently Asked Questions
What developer should I use to bleach lace wig knots?
20-volume developer. It’s strong enough to lift the knots but gentle enough to protect the delicate lace and hair. Never use 30 or 40 volume — they’re too harsh and will damage the knots and lace.
Can I bleach the knots on a synthetic lace wig?
No. Bleach destroys synthetic fibers. Knot bleaching only works on human hair wigs. For synthetic wigs, use the concealer or tinted-lace methods instead.
How long does it take to bleach knots?
Usually 15-30 minutes of processing time, plus prep, rinsing, toning, and conditioning. Budget about 60-90 minutes total for your first time. Darker, coarser hair takes longer to lift.
Will bleaching knots make my wig shed?
Some increased shedding over time is normal because bleaching weakens the knots. Proper technique (20 volume, golden-brown stopping point, thorough conditioning) keeps shedding minimal. Over-processing causes significant shedding.
How light should the knots be?
Aim for a light golden brown that matches your scalp tone, not white-blonde. For deep skin tones especially, medium-brown knots blended with tinted lace look more natural than fully bleached ones.
Can I bleach knots on an already-installed wig?
No. Always bleach on a mannequin head, never while the wig is on your head. The chemicals are dangerous near your scalp and skin, and you can’t control the process properly.
What if some knots are still dark after bleaching?
You can spot-bleach the remaining dark knots in a second light pass, but wait at least 48 hours for the hair to recover. Alternatively, use a touch of skin-tone concealer or foundation on the lace during install to hide them.
Is it better to bleach knots or buy a pre-bleached wig?
For beginners, buy pre-bleached. The factory process is controlled and consistent. Learn to bleach yourself on a cheaper practice unit before risking an expensive wig. For experienced wearers, bleaching yourself gives more control and saves money.
Does bleaching knots damage the lace?
It can, if you use too-strong developer or over-process. With 20-volume developer, thin application, and careful timing, the lace stays intact. Watch for any thinning or holes and stop immediately if you see them.
Continue Learning
- [Internal link to Blog #1] La guía completa de pelucas de encaje
- [Internal link to Blog #11] How to Pluck a Lace Wig for a Natural Hairline
- [Internal link to Blog #13] How to Make a Lace Wig Look Natural: 12 Pro Tips
- [Internal link to Blog #15] Why Does My Lace Wig Look Fake? 8 Common Mistakes
- [Internal link to Blog #3] How to Install a Lace Wig: Step-by-Step