
The difference between a lace wig that looks expensive and a lace wig that looks fake almost always comes down to one thing: the install. A $600 HD lace front installed badly will look worse than a $200 transparent lace front installed by someone who knows what they’re doing.
This guide walks you through the complete installation process — from prepping your natural hair to laying your final baby hair. We cover both glueless and adhesive installs, troubleshoot the most common mistakes, and share the small details our stylists have refined over thousands of installs on real Black women.
Installing a lace wig involves 8 steps: (1) prep your natural hair flat, (2) put on a wig cap, (3) cleanse and dry your hairline, (4) try on the wig and pin it in place, (5) cut the lace following your natural hairline, (6) secure with adhesive or elastic band, (7) tint and style the hairline (melt the lace, pluck if needed, lay edges), and (8) style the rest of the hair. The whole process takes 30–60 minutes for beginners and 15–25 minutes for experienced wearers.
Before You Start: What You’ll Need
Don’t skip this section. Trying to install a lace wig without the right tools is the fastest way to ruin your first unit. Our stylist team uses this exact list:
For glueless installs
- Wig cap (nylon or mesh, in your skin tone)
- Edge brush or fine-tooth comb
- Sharp small scissors (lace shears or thread snips work best)
- Hair clips or duckbill clips for sectioning
- Edge control gel (Got2B Glued, Ebin, or your preferred brand)
- Setting spray or hairspray
- Hot comb or flat iron (for melting baby hairs)
- Optional: foundation, BB cream, or fabric dye for tinting lace
Additional items for adhesive installs
- Skin protectant (Walker Tape Scalp Protector or similar)
- Lace adhesive (Got2B Glued spray, lace glue, or wig grip glue)
- Cotton swabs for clean application
- Blow dryer (cool setting) to set adhesive
- Adhesive remover for taking the wig down later
Don’t use cheap dollar-store scissors to cut lace. The blades aren’t sharp enough, and they’ll fray the lace edge instead of giving you a clean cut — which makes the hairline look more obvious. A pair of $10 thread snips from a fabric store will save you so much frustration.
Glueless vs. Glued Install: Which Should You Choose?
Before we walks you through the steps, you need to decide which install method you’re using. The full process differs between glueless and glued installs, and which is “better” depends on your goals.
| Factor | Glueless | With Adhesive |
|---|---|---|
| Hold time | 1 day to 1 week | 1 to 3 weeks |
| Edge safety | Gentle on hairline | Risk of breakage with frequent use |
| Skill required | Beginner-friendly | Intermediate to advanced |
| Looks natural | Yes, with good unit | Yes, with proper melt |
| Best for | Daily wear, swap-and-go | Long-term wear, events, vacations |
| Removal | Just take it off | Requires adhesive remover |
Recommendation: start glueless. If you’re new to lace wigs, going glueless protects your hairline while you learn. Once you’ve installed a few units and you know what you’re doing, you can experiment with adhesive for special occasions or long-term wear.
The Complete Step-by-Step Install
This is the master process . We’ve laid it out as 8 steps. Read through the whole thing once before starting your first install — some steps reference earlier prep, and you don’t want to discover that mid-install.
STEP 1 Prep Your Natural Hair
The flatter your natural hair, the better the wig sits. There are three main ways to prep:
- Cornrows / braid-down: the most popular method. Cornrow your hair flat against your scalp in straight back rows. This gives the wig a smooth foundation.
- Wrap method: for shorter or relaxed hair. Wrap your hair flat using a small amount of gel.
- Mousse-and-clip method: for very short natural hair or buzzed cuts. Apply mousse, smooth flat, clip until dry.
The goal is to eliminate any bumps or lumps that would show through the wig cap. Take your time here. A bad foundation will show every time you turn your head.
STEP 2 Put on a Wig Cap
The wig cap serves two purposes: it smooths your hair further and creates a buffer between your scalp and the wig.
- Pull the cap down over your hairline so the cap’s edge sits just behind where your natural hairline starts
- Tuck all baby hairs and edges under the cap (we’ll bring them out at the end)
- Make sure the cap is fully covering your ears in the temple area
If you have sensitive skin or you’re going for the longest possible hold, our stylists often skip the wig cap and instead apply a thin layer of mousse + a tight braid pattern. The cap can add bulk that makes the wig sit higher than your real hairline.
STEP 3 Cleanse Your Hairline
This step matters more for adhesive installs, but it’s worth doing every time.
- Use a cotton pad with rubbing alcohol to clean the skin where the lace will sit — your forehead, temples, and around your ears
- This removes oils, sweat, makeup residue, and skincare products that would prevent the lace from melting flat or the adhesive from gripping
- Let it dry completely (30 seconds)
- If you’re using adhesive, apply a thin layer of skin protectant now and let it dry tacky
STEP 4 Try the Wig On and Pin It in Place
Before you cut anything or apply any adhesive, the wig needs to sit perfectly. This is the step most beginners rush, and it’s the biggest reason wigs end up looking off.
- Place the wig on your head with the front lace flat against your forehead
- Adjust until the lace front sits at your natural hairline — not above it, not below it
- The ear tabs should line up with the top of your ears
- Pin the wig in place using duckbill clips or hair clips
- Look in the mirror from the front, both sides, and the back. Is it sitting evenly? Is the part falling where you want it?
If anything looks off, adjust now. Once you cut the lace, there’s no going back.
STEP 5 Cut the Lace
Use your sharp small scissors. Cut along the line you traced in Step 4, following the natural curve of your hairline.
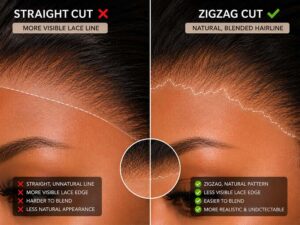
- Cut in small zigzag motions, not straight across. A straight cut creates an unnaturally hard edge.
- Leave a very small amount of lace beyond your hairline — about 1-2mm. This will be tucked under your skin as the lace melts.
- Cut around your ear tabs carefully, following the natural curve where hair would grow at your temples.
- Don’t try to cut everything in one go. Cut a little, check the mirror, cut a little more.
Mistakes here are permanent. If you’re nervous, leave more lace and trim down gradually after the wig is secured.
STEP 6 Secure the Wig
Now you choose your method. Both are written here:
Glueless method:
- If your wig has an adjustable elastic band built in, tighten it now to your head size
- Use the wig combs (sewn into the cap) to clip into your braids or wig cap
- For extra hold, add an elastic wig band around your head, sitting on the wig cap (not the wig itself)
- The wig should feel secure but not painfully tight
Adhesive method:
- Lift the front of the wig up slightly to expose the cleaned skin
- Apply a thin layer of adhesive (Got2B Glued spray, lace glue, or wig grip glue) along your hairline
- Let the adhesive get tacky — usually 30 seconds to 1 minute, depending on the product
- Press the lace down firmly into the adhesive, starting from the center and working outward
- Hold the lace in place for 30 seconds while it sets
- Use a blow dryer on cool setting to set the adhesive fully
- Repeat for the second layer if you’re going for maximum hold
When using Got2B Glued spray, three thin layers will hold better than one thick layer. Spray, let it get tacky, press; spray again, let it tack up, press; repeat. The product builds adhesion in layers, not in volume. A thick single application just creates a sticky mess that doesn’t hold any longer than a thin layer would.
STEP 7 Melt the Lace, Tint, and Lay Edges
This is where a good install becomes a great one. Three sub-steps:
7a. Melt the lace:
- Apply a small amount of edge control or gel to your hairline, over the lace
- Use a soft brush or fingertip to smooth the lace flat against your skin
- Wrap your head with an elastic band or scarf for 5–10 minutes to set the lace flat
7b. Tint the lace (if needed):
- For medium-to-deep skin: dab foundation or BB cream onto the lace using a damp sponge
- Build up coverage in layers; one heavy coat looks cakey
- Match the lace to your skin tone, not your wig tone
- If your wig is pre-tinted from the factory, you can usually skip this step
7c. Lay your edges:
- Use a thin-tooth comb or edge brush to bring out your baby hairs
- Apply edge control gel — a small amount goes a long way
- Style baby hairs in a natural, slightly uneven pattern. Avoid perfect symmetrical swirls — they look fake
- Use a soft toothbrush to smooth and shape

STEP 8 Style the Rest of the Hair
The unit is installed. Now you can style the body of the hair however you want.
- Apply heat protectant before using flat irons or curling wands
- Use products designed for human hair, not synthetic — they’re less drying
- If you’re parting the wig, cut a small piece of darker tape or fabric and slide it under the lace where you want the part, to mimic scalp showing through
- Finish with a light setting spray
Pluck the Hairline (If Needed)
If your wig didn’t come pre-plucked from the factory — or the pre-pluck was too uniform — you’ll need to do some plucking yourself before install.
Plucking removes individual hairs from the lace to thin out the hairline, mimicking how natural hair grows in uneven density. A perfectly dense hairline reads as fake; a strategically plucked one looks real.
How to pluck without ruining your wig
- Put the wig on a mannequin head (do this before install — plucking is much easier with the wig flat)
- Use precision tweezers
- Pluck individual hairs, one at a time, working from the center of the hairline outward
- Pluck more from the very front edge (1-2 cm from the lace edge), less from deeper in
- Avoid plucking in straight lines — vary the density pattern
- Stop frequently and check the mirror. Once it’s gone, it’s gone.
Beginners almost always pluck too much. The instinct is to keep going until the hairline looks “thin enough,” but real hair doesn’t look thin at the front — it looks softly graduated. Pluck 10 hairs, stop, hold the wig up, look at it from arm’s length. If it still looks too dense, pluck 10 more. We’ve seen women destroy a $400 wig by over-plucking in 5 minutes.
How to Take Down a Lace Wig
Just as important as install is removal. Tearing a wig off improperly damages the lace and the hair, and shortens the wig’s lifespan dramatically.
For glueless installs
- Loosen the elastic band or wig combs
- Lift the wig from the back to the front, slowly
- If edge control has hardened, mist with water first to soften
For adhesive installs
- Apply adhesive remover (Walker Tape C-22, isopropyl alcohol, or your brand’s specific remover) along the hairline
- Let it sit for 2-3 minutes to break down the adhesive
- Gently lift the lace away from your skin — do not pull
- If the lace resists, apply more remover and wait longer. Never force it.
- Once removed, clean the lace edge with adhesive remover before storing
Common Install Mistakes (And How to Fix Them)
Here are the most common ones, with fixes:
Mistake 1: The wig is sitting too high (or too low) on the forehead
Why it happens: The wig wasn’t tried on and positioned before cutting the lace.
Fix: If too high, you can lower it slightly by repositioning, but only if you didn’t cut too much lace. If too low, you can trim more lace — but stop before you cut into the actual hair line.
Mistake 2: The lace is gray or obvious against your skin
Why it happens: The lace wasn’t tinted, or it was the wrong shade of lace for your skin.
Fix: Apply foundation to the lace using a damp sponge. Build in layers. For deeper skin, consider buying pre-tinted lace next time.
Mistake 3: The lace is lifting at the temples or front
Why it happens: Adhesive failed, oils on the skin, or the wig is too big.
Fix: Apply more adhesive in thin layers; clean the skin again first; check if the wig has an adjustable strap that needs tightening.
Mistake 4: Baby hairs look fake or cartoonish
Why it happens: Over-styled, too symmetrical, or too thick.
Fix: Less is more. Use a thin-tooth comb to break up the swirls. Real baby hairs grow in soft, irregular patterns — mimic that.
Mistake 5: The hairline still looks too dense
Why it happens: Not enough plucking, or plucking in the wrong spots.
Fix: Pluck from the front 1-2 cm of the lace, not deeper. Take off small amounts at a time.
Mistake 6: The part doesn’t look like scalp
Why it happens: The lace under the part is too dense, or there’s no contrast to read as scalp.
Fix: Add a small piece of darker fabric or makeup-tinted tape under the lace at the part, to create the illusion of scalp showing through.
How Long Does a Lace Wig Install Last?
This depends entirely on your install method and how you treat the wig:
| Install Type | Typical Hold | Max Hold |
|---|---|---|
| Glueless, no band | 1 day | 1-2 days |
| Glueless, with elastic band | 3-5 days | 1 week |
| Got2B Glued spray | 3-5 days | 1 week |
| Lace glue (liquid adhesive) | 1-2 weeks | 3 weeks |
| Professional install with hard hold | 2-3 weeks | 4-6 weeks |
We strongly recommend taking your wig down at least every 1-2 weeks, even if the install is still holding. Your scalp, edges, and hairline need to breathe. The women we see with the worst lace-related hair damage are the ones who keep an install in for a month or more. Two weeks is the absolute maximum.
Tips
Small details that take an install from “good” to “the unit is giving real scalp”:
- Always wash and condition the wig before the first install. Factory products and silicone coating make the hair feel fake. A wash before install resets the hair to its true texture.
- Use a darker lace tint than your skin. Lace lightens slightly when stretched against skin, so going one shade darker in your tint matches better in real-world lighting.
- Don’t install on freshly shaved or waxed skin. The skin is too sensitive and adhesives can irritate. Wait 24 hours.
- Apply edge control after the wig is installed, not before. Pre-applying gel to your hairline makes it harder for adhesive to grip.
- If you sweat heavily, mist your hairline with setting spray after install. This locks in the adhesive longer.
- Save the lace scraps you cut off. They can be used to patch tears or as practice material for plucking technique.
Frequently Asked Questions
How long does it take to install a lace wig?
For a first-time install, expect 60-90 minutes. With practice, the full process drops to 30-45 minutes. Experienced wearers can do a glueless install in 15-20 minutes.
Do I need to wash my lace wig before installing it?
Yes, we strongly recommends washing your wig before the first install. New wigs often have silicone coating, factory product residue, and a slight chemical smell. A gentle wash with sulfate-free shampoo plus a deep conditioner brings the hair back to its natural state.
Can I install a lace wig by myself, or do I need a stylist?
You can absolutely install a lace wig by yourself — most experienced wearers do. The first few installs will be slow and a little frustrating. By the fourth or fifth install, it becomes second nature.
Will lace glue damage my hairline?
It can, if used too often or removed improperly. The damage usually comes from (1) applying adhesive directly to the hairline hairs instead of the skin, or (2) pulling the wig off without using adhesive remover. Use skin protectant and proper removal technique, and limit adhesive use to special occasions rather than daily wear.
What’s the best adhesive for a lace wig?
For beginners, Got2B Glued spray is the easiest to work with and forgives mistakes. For longer hold, Walker Tape Ultra Hold or Bold Hold liquid adhesives are industry standards. Avoid bargain brand lace glues — they’re more likely to cause skin reactions and don’t hold longer.
How often should I take my wig off?
For glueless installs, take it off nightly when possible. For adhesive installs, every 1-2 weeks at the absolute maximum. Your scalp needs to breathe, and your edges need rest from any pressure or adhesive.
Can I sleep in my lace wig?
Yes, but with care. Wrap your hair in a satin or silk scarf, or use a satin bonnet. Cotton pillowcases destroy the hair and lift the lace. If you wear adhesive, sleeping in the wig for a few nights is fine. For glueless installs, taking it off at night extends its lifespan considerably.
Continue Learning
This is the master install guide. From here, we recommends these next:
- [Internal link to Blog #1] The Complete Guide to Lace Wigs
- [Internal link to Blog #11] How to Pluck a Lace Wig for a Natural Hairline
- [Internal link to Blog #12] How to Lay Your Edges with a Lace Wig (Without Damage)
- [Internal link to Blog #17] Why Is My Lace Lifting? How to Keep Your Wig Secured All Day
- [Internal link to Blog #9] How to Wash a Lace Wig Without Damaging It