
Published: May 2026 | Last updated: May 2026 Reading time: 13 minutes
Laid edges can make or break a lace wig install. You can have a flawless melt and a perfectly plucked hairline, but if your baby hairs are stiff, crunchy, or swirled into unnatural patterns, the whole look reads as “trying too hard.” Done right, edges soften the hairline, blend your natural hair with the unit, and add that polished finish that ties everything together.
But here’s what most edge tutorials don’t tell you: laying your edges over and over, with the wrong products and too much manipulation, is one of the fastest ways to thin out and permanently damage your real edges. For a community where edges are everything, that’s a serious trade-off.
This guide covers both sides — how we lays natural-looking edges, and how to protect the real hair underneath so you’re not sacrificing your hairline for a hairstyle.
What “Edges” Actually Are
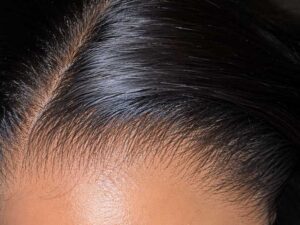
Your edges are the fine, delicate baby hairs along your hairline — at the front, around the temples, and at the nape. With a lace wig, “laying your edges” usually refers to styling the baby hairs left out at the front (either your own or the wig’s pre-set baby hairs) so they blend the lace into your natural hairline.
Well-laid edges do three things:
- Soften the front of the lace so there’s no hard line where the wig begins
- Blend the wig with your natural hairline for a seamless transition
- Add a finished, polished detail that signals care and intention
Whose Edges Are You Laying — Yours or the Wig’s?
This matters because the approach differs:
| Scenario | What You Lay | Approach |
|---|---|---|
| Frontal install (edges covered) | The wig’s baby hairs | Style the pre-cut baby hairs on the lace itself |
| Closure install (edges left out) | Your own natural edges | Blend your real baby hairs with the wig |
| Leave-out style | Your own edges + some leave-out | Blend natural hairline fully with unit |
With a frontal that covers your whole hairline, you’re styling the wig’s baby hairs (created during plucking or pre-cut at the factory). With a closure where your edges are left out, you’re laying your own real baby hairs to blend with the wig. The product and technique are similar, but protecting your real edges only applies when they’re the ones being styled.
What You’ll Need
- Edge control gel — alcohol-free is gentler on real hair
- Edge brush (double-sided) or a clean soft toothbrush
- Rat-tail comb for parting out baby hairs
- A silk or satin scarf (or edge wrap) to set the edges
- Setting spray or a little water
- Optional: blow dryer on cool to speed setting
The Step-by-Step Method
STEP 1 Part Out Your Baby Hairs
- Use the rat-tail comb to gently separate a thin row of baby hairs along the very front of the hairline
- Only take the finest, shortest hairs at the front — not thick chunks
- The rest of the hair stays back, away from the edge area
- Less is more: thin, wispy baby hairs look natural; thick clumps look fake
STEP 2 Apply a Small Amount of Edge Control
- Scoop a pea-sized amount of edge control onto the back of your hand
- Pick it up with the edge brush
- Apply lightly to the baby hairs — you can always add more, but too much makes edges greasy and crunchy
- Work the product through with the fine-bristle side of the brush
The biggest mistake we see is way too much product. People scoop a fingerful of gel and cake it on, ending up with white residue, crunchy texture, and edges that flake by midday. A genuine pea-sized amount is enough for the entire hairline. If your edges feel wet and heavy, you’ve used too much — work some out with a clean brush.
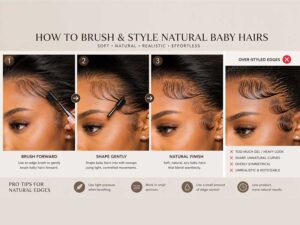
STEP 3 Shape the Edges
- Use the fine-bristle side of the edge brush to swoop the baby hairs into soft curves
- Follow the natural direction your hair grows — usually a gentle downward-and-outward sweep
- Keep the shapes soft and irregular; avoid stiff geometric swirls
- Two or three soft swoops on each side of the center is plenty for a natural look
- For a more styled look, you can add a few defined curls — but keep them subtle
STEP 4 Refine and Smooth
- Use a clean soft toothbrush to smooth out any flyaways
- Adjust the shape until both sides look balanced (but not perfectly identical)
- Wipe away any product that got onto your skin or the lace with a damp cotton swab
STEP 5 Set the Edges
- Lightly mist with setting spray or a tiny bit of water
- Wrap a silk or satin scarf snugly (not too tight) around your hairline
- Leave for 5-10 minutes to let the edges set flat
- For faster results, blow-dry on cool over the scarf
- Remove the scarf — your edges should be laid and holding
Making Edges Look Natural (Not “Drawn On”)
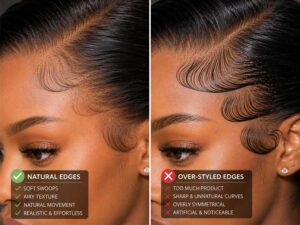
The current trend has moved away from heavy, dramatic, swirled edges toward soft, natural-looking baby hairs. Here’s how our stylist team keeps edges looking real:
- Vary the length. Real baby hairs aren’t all the same length. Let some be shorter, some longer.
- Keep them thin. Wispy and fine reads natural; thick and defined reads styled/fake.
- Avoid perfect symmetry. Mirror-image swirls look artificial. Real hairlines are slightly uneven.
- Less product, less shine. High-shine, wet-looking edges look more obviously “done.” A soft matte finish is more natural.
- Follow your natural growth pattern. Lay edges in the direction your hair actually grows, not against it.
Protecting Your Real Edges (The Part Nobody Talks About)
This is the most important section in this guide, and the one most tutorials skip entirely. Laying your real edges daily — with stiff gels, constant brushing, and tension — is a leading cause of traction alopecia and thinning hairlines in our community.
Here’s how to keep your edges healthy while still wearing lace wigs:
Give your edges rest days
Don’t lay your edges every single day. The repeated brushing, product, and tension stress the delicate baby hairs. Build in days where you wear your hairline natural or wear a style that doesn’t require laid edges.
Choose gentle products
Alcohol-free, nourishing edge controls protect your hair better than harsh extreme-hold gels. Some formulas even include ingredients like castor oil or biotin that support hair health.
Don’t braid too tight underneath
When prepping your natural hair for a wig, tight cornrows or braids at the hairline create constant tension. This is a major (and often overlooked) cause of edge loss. Keep the braids at your hairline looser.
Remove product fully at night
Sleeping in edge control lets the product sit on your hairline for hours, drying it out. Cleanse your edges gently before bed and apply a nourishing oil (castor, jojoba) to support regrowth.
Avoid daily glue on the hairline
Adhesive directly on your edges, removed daily, pulls out baby hairs over time. Glueless installs protect your edges significantly.
How to Regrow Thinning Edges
If your edges are already thinning from years of styling, there are steps that may help them recover:
- Massage with growth oils — castor oil, rosemary oil, and peppermint oil are popular for stimulating the hairline (gently massage nightly)
- Take a break from tension styles — give the hairline months of rest from wigs, braids, and laid edges
- Be consistent and patient — edges regrow slowly, often taking 3-6 months to show improvement
- See a professional — a dermatologist can prescribe treatments (like minoxidil) for stubborn cases
- Wear glueless, low-tension installs while regrowing
Note: we can share community knowledge, but we’re not medical professionals. For significant or persistent hair loss, a dermatologist or trichologist is the right call.
Common Edge Mistakes
Mistake 1: Too much product
What happens: White residue, crunchy edges, flaking by midday. Fix: Pea-sized amount only.
Mistake 2: Stiff, over-styled swirls
What happens: “Drawn-on,” fake look. Fix: Soft, irregular, natural curves.
Mistake 3: Laying edges every single day
What happens: Traction thinning over time. Fix: Build in rest days.
Mistake 4: Harsh, alcohol-heavy gels on real hair
What happens: Dryness, breakage, edge loss. Fix: Alcohol-free, nourishing formulas.
Mistake 5: Tight braids at the hairline under the wig
What happens: Constant tension, receding hairline. Fix: Looser braids at the front.
Mistake 6: Sleeping in edge control
What happens: Product dries out and damages baby hairs overnight. Fix: Cleanse and oil before bed.
Mistake 7: Taking too-thick sections as baby hairs
What happens: Chunky, unnatural edges. Fix: Only the finest front hairs.
Frequently Asked Questions
What’s the best edge control for lace wigs?
For laying the wig’s baby hairs, any strong-hold edge control works. For laying your own real edges regularly, choose an alcohol-free, nourishing formula to protect your hairline. The gentlest product that gives you the hold you need is the right one.
Does laying your edges damage your hairline?
It can, if done daily with harsh products and tension. The repeated brushing, drying gels, and pulling stress the delicate baby hairs and can cause traction alopecia over time. Rest days, gentle products, and low-tension installs protect your edges.
How do I lay edges on a frontal that covers my hairline?
With a frontal, you style the wig’s baby hairs (the fine hairs created during plucking or pre-cut at the factory) rather than your own. The technique is the same — small amount of edge control, soft swoops, set with a scarf — but you don’t have to worry about damaging your real edges since they’re covered.
How long do laid edges last?
Typically a full day with good edge control. Humidity, sweat, and touching them shortens the hold. A light re-set with the brush and a touch more product refreshes them if needed.
Can I lay my edges without edge control?
Yes — some people use a small amount of styling gel, mousse, or even just water and a scarf to set fine baby hairs. The hold won’t be as strong, but it’s gentler on your hair.
Why do my edges look crunchy?
Too much product, or a product with a hard, stiff hold. Use less edge control, choose a softer-hold formula, and smooth with a clean toothbrush after applying. A soft, flexible finish looks more natural than a stiff one.
How do I regrow my edges after traction damage?
Take a break from tension styles, massage with growth oils (castor, rosemary), be patient (3-6 months), and see a dermatologist for persistent cases. Wear glueless low-tension installs while regrowing. Early traction alopecia is often reversible; advanced cases may need professional treatment.
Should I lay edges before or after installing the wig?
After the wig is installed and secured. Laying edges first can interfere with adhesive grip and the melt. Install, melt the lace, then lay your edges as the finishing step.
Continue Learning
- [Internal link to Blog #1] The Complete Guide to Lace Wigs
- [Internal link to Blog #11] How to Pluck a Lace Wig for a Natural Hairline
- [Internal link to Blog #10] How to Bleach Knots on a Lace Wig
- [Internal link to Blog #13] How to Make a Lace Wig Look Natural: 12 Pro Tips
- [Internal link to Blog #3] How to Install a Lace Wig: Step-by-Step