
Published: May 2026 | Last updated: June 2026 Reading time: 15 minutes
The goal with any lace wig is the same: you want it to look like the hair is growing out of your own scalp. No visible lace, no obvious hairline, no “is that a wig?” double-takes. When a lace wig looks natural, no one should be able to tell — and the difference between a wig that passes and one that doesn’t usually comes down to a handful of small details.
Here are the 12 tips, roughly in order of impact:
1.Tint the Lace to Match Your Skin
This is the single biggest factor for most people, and the most commonly skipped. Lace straight from the factory — even “HD” lace — is usually too light for medium-to-deep skin tones, and it reads as a grayish patch against your scalp.
Dab foundation, BB cream, or a fabric-dye tint onto the lace using a damp sponge, building in light layers. Match the lace to your skin tone, not your hair color. For deep complexions, consider buying a pre-tinted unit so the color is dyed in rather than sitting on top.
2.Bleach the Knots
The tiny dark dots where each hair is tied to the lace (the knots) cast a shadow that reads as “wig” up close. Bleaching them to a light golden brown makes them blend into the lace and disappear. Buy pre-bleached if you’re nervous, or follow a careful bleaching process with 20-volume developer. (See our full knot-bleaching guide.)
3.Pluck the Hairline for a Gradual Density
Real hairlines fade from sparse at the front edge to full toward the crown. Factory wigs come dense and uniform. Pluck the front 1-2 inches in a scattered, uneven pattern to recreate that gradient — and stop while it still looks slightly too dense. Over-plucking is permanent. (See our plucking guide.)
4.Lay Your Baby Hairs Softly
Soft, wispy, slightly uneven baby hairs blend the lace into your hairline. Stiff, symmetrical, heavily-gelled swirls do the opposite — they scream “styled.” Use a pea-sized amount of edge control and aim for natural, irregular swoops. (See our edges guide.)
5.Melt the Lace Flat
“Melting” the lace means getting it to lie completely flat against your skin so there’s no visible edge or lift. After install, apply a little gel or mousse over the lace, smooth it down, and wrap with an elastic band or scarf for 5-10 minutes. A lifted or bumpy lace edge is an instant giveaway.
6.Choose the Right Density
Density that’s too high is one of the most common reasons a wig looks fake — a super-thick wall of hair doesn’t match how most natural hair looks at the hairline. For the most natural result, 150% density photographs the most realistically, while 180% gives a fuller look that still reads natural for most Black women. Avoid 200%+ unless you specifically want a dramatic, glam look. (See our density guide.)

7.Match the Hairline to Your Natural Shape
When you cut and shape the lace, follow your own natural hairline — including any widow’s peak, curve, or asymmetry you naturally have. A wig hairline that matches your real one (which people who know you are used to seeing) looks far more believable than a generic shape.
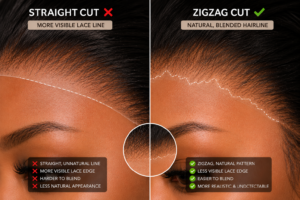
8.Cut the Lace in a Zigzag
Never cut the lace in a straight line. A straight cut creates a hard, unnatural edge. Cut in small zigzag motions following your hairline, and leave just 1-2mm of lace beyond the hairline to melt into your skin.
9.Tone Down the Shine
Brand-new wig hair — especially processed human hair and synthetic — often has an unnatural sheen that real hair doesn’t have. To reduce it: wash the wig before first wear to remove factory silicone coating, use a tiny amount of dry shampoo or setting powder to dull excessive shine, and avoid heavy shine sprays. Real hair has a soft, natural luster, not a plastic-y gleam.
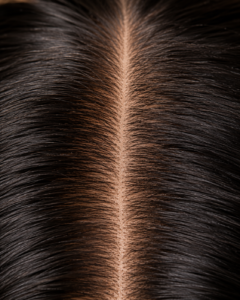
10.Create a Realistic Part
A flat, dense part where you can’t see “scalp” looks fake. To create a realistic part: apply a little skin-tone concealer or tinted powder along the part line, or place a thin strip of skin-tone tape under the lace at the part. This mimics scalp showing through, which is what a real part looks like.
11.Blend the Temples with Your Skin
The temple area (where the lace meets the sides of your face) is a common giveaway. Make sure the lace is tinted and melted all the way to the temples, the baby hairs there are soft and sparse, and there’s no hard edge or lifting where the wig meets your skin near your ears.
12.Wash Out Factory Product Before First Wear
New wigs arrive coated in silicone and factory product that makes the hair look glossy and feel slightly stiff or “fake.” A gentle wash with sulfate-free shampoo and a deep conditioner before your first install resets the hair to its natural texture and movement. This one step makes the hair behave much more like real hair. (See our washing guide.)
Putting It All Together: The Natural-Look Priority Order
If you can’t do everything, here’s the order of impact our team would prioritize:
| Priority | Tip | Impact | Effort |
|---|---|---|---|
| 1 | Tint the lace | Very high | Low |
| 2 | Melt the lace flat | Very high | Low |
| 3 | Zigzag cut | High | Very low |
| 4 | Bleach knots | High | Medium |
| 5 | Pluck hairline | High | Medium |
| 6 | Right density | High | At purchase |
| 7 | Lay baby hairs | Medium-high | Low |
| 8 | Wash out factory product | Medium | Low |
| 9 | Realistic part | Medium | Low |
| 10 | Tone down shine | Medium | Low |
| 11 | Match natural hairline | Medium | Low |
| 12 | Blend temples | Medium | Low |
Notice that the two highest-impact tips — tinting and melting the lace — are both low effort. If you’re short on time, those two alone will dramatically improve how natural your wig looks.
The Mistakes That Make Wigs Look Fake
Flipping the list around, here are the things that most commonly give a wig away:
- Untinted lace glowing gray against the skin
- A lifted or bumpy lace edge that isn’t melted flat
- A straight scissor line across the hairline
- Dark knots creating a shadow at the roots
- Too-dense hairline that looks like a wall of hair
- Stiff, swirled baby hairs that look drawn-on
- Unnatural shine from factory coating
- A flat, scalp-less part
- Wrong size cap that sits too high or shifts around
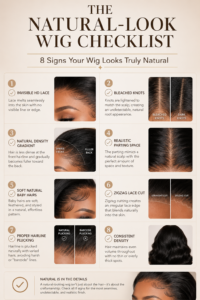
Quick Natural-Look Checklist
Before you walk out the door, run through this:
- ☐ Lace tinted to match my skin?
- ☐ Lace melted flat with no lifting?
- ☐ Hairline cut in a zigzag (no straight line)?
- ☐ Knots bleached or concealed?
- ☐ Hairline plucked to a natural gradient?
- ☐ Baby hairs soft and natural?
- ☐ Part looks like scalp?
- ☐ Temples blended with no hard edge?
- ☐ Shine toned down?
- ☐ Checked in natural light AND with flash?
Frequently Asked Questions
What’s the most important thing to make a lace wig look natural?
Tinting the lace to match your skin tone. It’s the highest-impact, lowest-effort step, and untinted lace is the single most common reason a wig looks fake — especially on medium-to-deep skin where light lace glows gray.
Why does my lace wig look fake even though it’s expensive?
Price doesn’t determine how natural a wig looks — prep and install do. A pricey wig worn straight from the bag (untinted lace, unmelted edge, dense unplucked hairline) will look more fake than a budget wig prepped correctly. Focus on the technique.
Do I need to bleach the knots for a natural look?
It helps significantly, but it’s not the only option. If you don’t want to bleach, you can conceal the knots with skin-tone makeup on the lace during install, or buy a pre-bleached unit. Tinting and melting the lace matter even more than bleaching.
How do I stop my wig from looking shiny and fake?
Wash out the factory silicone coating before first wear, use a tiny amount of dry shampoo or setting powder to dull excess shine, and avoid heavy shine sprays. Real hair has a soft luster, not a plastic gleam.
What density looks the most natural?
150% density photographs and reads the most natural for most people. 180% gives a fuller look that still appears natural for many Black women. Densities of 200%+ tend to look obviously thick and “wig-like” unless you specifically want a glam, dramatic style.
How do I make the part look real?
Apply skin-tone concealer or tinted powder along the part line, or place a thin strip of skin-tone tape under the lace at the part. This creates the illusion of scalp showing through, which is what a real part looks like. A flat, dense, scalp-less part is a giveaway.
Why does my wig look fake at the temples?
The temple area often gets neglected. Make sure the lace is tinted and melted all the way to the temples, the baby hairs there are soft and sparse, and there’s no hard edge or lifting where the wig meets your skin near your ears.
Can a beginner make a wig look natural?
Absolutely. The two highest-impact steps — tinting and melting the lace — are both beginner-friendly and quick. Start with those, add a zigzag cut, and you’ll already be ahead of most. The more advanced steps (bleaching, plucking) come with practice.
Continue Learning
- [Internal link to Blog #1] The Complete Guide to Lace Wigs
- [Internal link to Blog #10] How to Bleach Knots on a Lace Wig
- [Internal link to Blog #11] How to Pluck a Lace Wig for a Natural Hairline
- [Internal link to Blog #12] How to Lay Your Edges with a Lace Wig
- [Internal link to Blog #15] Why Does My Lace Wig Look Fake? 8 Common Mistakes